Defining a Site In Dreamweaver
by ww667
Why to define a page.
You should always define a page so that dream weaver knows where all files
should be and what file types are you working on. This prevent problems with
paths to your hard drive files later on when the site is online. While
defining a page you will have a lot of options you can chose from.
What are the options?
You will have a two ways how to define a web page. One is a wizard and
other is an advanced mode.
1. Click the Define site from the main menu.
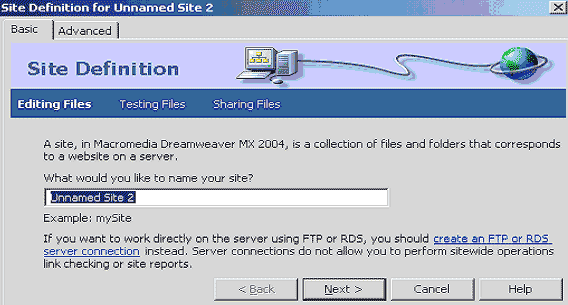
2. On the first screen Dreamweaver will ask you the name of the web site.
Name your site something related to the site so you can remember what this
web is. For example I will cal this page “My first defined page”. After
renaming a page click next.
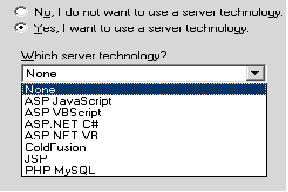 3.
On the next page Dreamweaver will ask you would you like to use any server
technology as ASP Net PHP or any other, if you don’t wish to use any of
these technologies just click next (no should be on by default), but if you
do wish to use them click yes and you will be presented with choice of
available technologies. The available technologies screen is shown on the
right where you would chose the one you are planning to use if you do and
click next. Here we will not use advanced technologies. 3.
On the next page Dreamweaver will ask you would you like to use any server
technology as ASP Net PHP or any other, if you don’t wish to use any of
these technologies just click next (no should be on by default), but if you
do wish to use them click yes and you will be presented with choice of
available technologies. The available technologies screen is shown on the
right where you would chose the one you are planning to use if you do and
click next. Here we will not use advanced technologies.
4. Dreamweaver now wants to know how are you planning to work with your
files. First option will allow you to create a page on your computer and
after that upload it to your web server, but the second one will place files
directly on your local web server. In this example chose the option to edit
files on this computer and upload them to internet after.
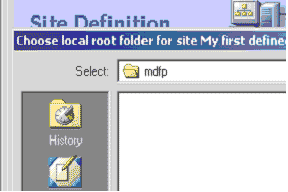 5.
Next, Select where on your computer would you like to store files while you
are working on them. I recommend that you create a folder on your computer
in any location where you will have a fast access to it, I will do that
under my documents and call folder “mdfp” and that stands for my first
defined page. I recommend you to not use any spaces and case sensitive
letters or any symbols in the title or folder names as it my cause you some
problems later on. We will centralize our website work area on the computer. 5.
Next, Select where on your computer would you like to store files while you
are working on them. I recommend that you create a folder on your computer
in any location where you will have a fast access to it, I will do that
under my documents and call folder “mdfp” and that stands for my first
defined page. I recommend you to not use any spaces and case sensitive
letters or any symbols in the title or folder names as it my cause you some
problems later on. We will centralize our website work area on the computer.
 Click
an folder icon and browse to the folder just created. Click next button. Click
an folder icon and browse to the folder just created. Click next button.
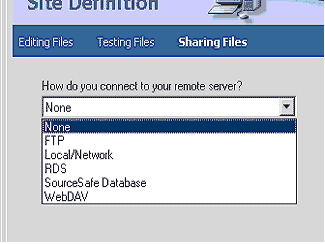
6. Dreamweaver will ask for the way you are uploading your files to the
web server. My preferred is none as I usually use some other software to
upload and manage all the files on the server. But while we are here I will
explain first two
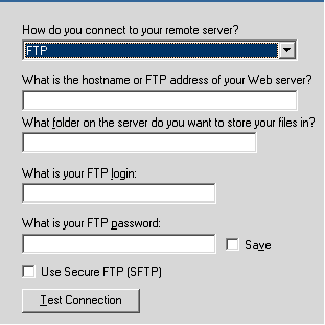 FTP
(Fife Transfer Protocol) is one of the moist popular ways to upload a
page to the internet. If you do chose this option you will be presented with
the following options. FTP
(Fife Transfer Protocol) is one of the moist popular ways to upload a
page to the internet. If you do chose this option you will be presented with
the following options.
- The hostname is the name of your FTP server, you will get this address
from the company witch is handling your server.
- The same thing is about the option 2.
- FTP login is a name by witch server knows you (the same as email name)
- Password well I think you know what is that.
- Save option will memorize the login name and a password, do you need
to use a SFPT is depending on the hosting company you use.
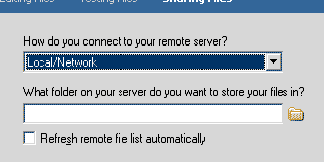
Local/Network you don’t get so many options. Chose of path where
your local server located.
I will chose none and click next.
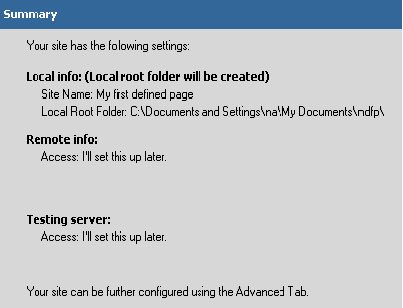 7.
You will get a confirmation box that your web is now set up! You are done!
You are now ready to add pages, create library items and templates. 7.
You will get a confirmation box that your web is now set up! You are done!
You are now ready to add pages, create library items and templates.
|


