|
1. You need to make an empty movie clip. To do
this, press Ctrl+F8 to insert a symbol, and check the radio button for
"movie clip". Name it something like rotation, or text
orbit.
2. Now you should see a blank canvas with a plus sign (+)
in the middle. Here is where we will make the orbit. Begin by
drawing a circle. This will be your guide as to how to rotate the
letters(Step 4).
 3. Create a text box and type something in.
Note: I do not recommend it being more than a couple of words because then
it will look very bad when you have a huge circle, and it will take an ungodly
amount of time. Now we have to break apart the text. Do this by
right-clicking the text box, and clicking "Break Apart". 3. Create a text box and type something in.
Note: I do not recommend it being more than a couple of words because then
it will look very bad when you have a huge circle, and it will take an ungodly
amount of time. Now we have to break apart the text. Do this by
right-clicking the text box, and clicking "Break Apart".
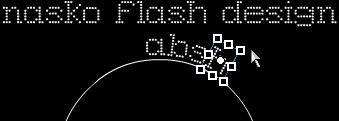 4. We will now enter the most time consuming part of this
tutorial. Now that your text is broken up into each letter, it is time to
place them on the circle by rotating them to fit the circle. To make this
easier, make sure "Snap to objects" is off. You can check this
by click on the "View" menu at the top, and make sure that there is no
check next to "Snap to Objects". 4. We will now enter the most time consuming part of this
tutorial. Now that your text is broken up into each letter, it is time to
place them on the circle by rotating them to fit the circle. To make this
easier, make sure "Snap to objects" is off. You can check this
by click on the "View" menu at the top, and make sure that there is no
check next to "Snap to Objects".
Tip: Space your words out evenly as possible - it looks better when it actually
is done...
5. Was that fun? I have been doing Flash for
about 2 1/2 years and it took me about a half hour to get that to look perfect,
so take your time. Well anyways, now that you have all the text around the
circle, it is time to tween it. Now you can delete the circle, because we
no longer have a need for it. Now select all your text(may look a little
weird). Now that your text is selected, convert it into a graphic by
pressing F8.
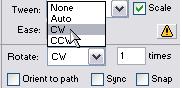 6. Now select Frame 1 and "Create Motion Tween"
by right clicking on the frame. Now put another Keyframe at frame
200. There should now be a long blue arrow in the timeline. Click on
Frame 1 again, and tell it to rotate Clockwise(see picture below) 6. Now select Frame 1 and "Create Motion Tween"
by right clicking on the frame. Now put another Keyframe at frame
200. There should now be a long blue arrow in the timeline. Click on
Frame 1 again, and tell it to rotate Clockwise(see picture below)
7. Woohoo! We are now done with the movie clip. The
rest is easy stuff. Now go back to Scene 1, and push Ctrl+L to bring up
the library window. In it you should see the Movie Clip you just
created. To bring it onto your canvas, simply click and drag. Now it
is time to create a a ball. Make a new layer, and create a circle with a
radial gradient on frame 1. Also, Instead of having the color square the middle,
try using the Paint Bucket and clicking in one of the corners of the circle to
give it a 3D
appearance.
Note: I am completely aware that circles do not have corners, but I think
you know what I mean ;-)
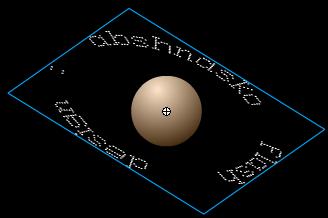 8. Now that you have your movie clip and ball on the
canvas(see my picture below), it is time to make your Movie Clip "orbit" rather
that "encircle". To do this select your movie clip, right click and select
"Rotate and Skew". Here you can use the Scale feature to lean the text
back, and Rotate to give it a tilt. 8. Now that you have your movie clip and ball on the
canvas(see my picture below), it is time to make your Movie Clip "orbit" rather
that "encircle". To do this select your movie clip, right click and select
"Rotate and Skew". Here you can use the Scale feature to lean the text
back, and Rotate to give it a tilt.
9. You should now have a working Orbit. Confirm this
by pushing Ctrl+Enter to test your movie.
|


