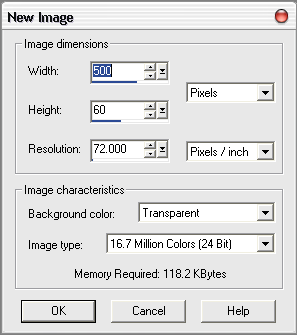
|
2. Now flood fill the image with black, Click on Ctrl+A this
will select the whole image. Go to Selections>>Modify>>Contract
and set the amount of pixels to 5 you image should now look like
this.

We now need to add a new layer Layers>>New Raster Layer
(Note: Make sure you do not deactivate your selection.) Fill this
new layer with this color #73926E, your image will now look like
this. You can now deselect your selection by pressing Ctrl+A.

3.In this step we will be adding the text to our display. Click
on the Text tool
 and click on your image, this will make the below box appear change
your settings so they are the same but set your fill color to #4D734D (Note:
You
May NOT have the same digital font as me but you probably do have
one if you don't they are easy enough to find by doing an internet
search)
and click on your image, this will make the below box appear change
your settings so they are the same but set your fill color to #4D734D (Note:
You
May NOT have the same digital font as me but you probably do have
one if you don't they are easy enough to find by doing an internet
search)
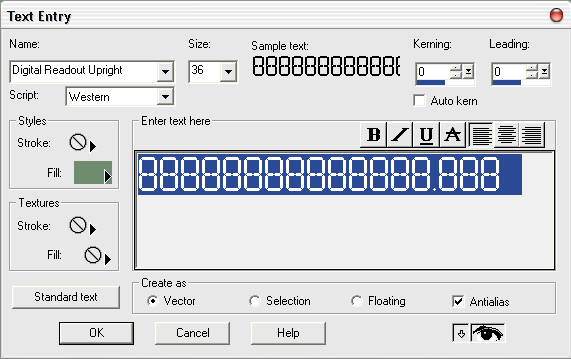
When you click ok text should appear on your image, you will
need to center it as best you can. Once in the middle go to Layers>>Convert
To Raster Layer. now repeat this step again but change the text
to DEVELOPINGWEBS.NET and color to black, Your image should now
look like this.

4. Now you need to draw a rectangle selection with the feather
set to 7 in the top left of the LCD screen

Change your selection type form rectangle to Ellipse. Hold down
Ctrl and draw an ellipse form the bottom right of the LCD screen
so that it intersects with half of the rectangle selection. Go to
Layers>>New Raster Layer and call it highlight.

Select your gradient tool and set it to fading foreground, you
must make sure your foreground color is set to white
 set your gradient to the following and fill your selection

This is what your image should now look like, If you feel like
your highlight was to dark as I did lower the opacity of your layer.

Now all you need to do is add a highlight in the bottom right
corner and your done.

|